Product Description
Nikon F Fully Automatic Single Lens Reflex Instructions
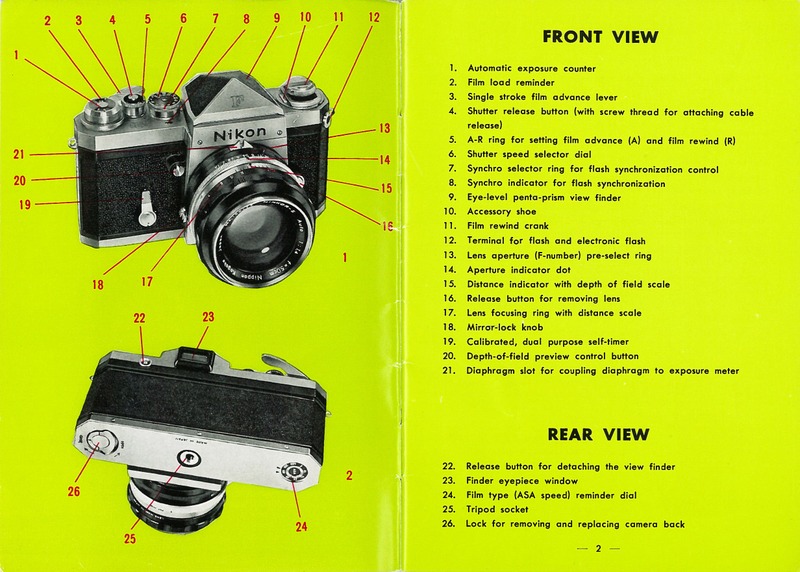
- Front View2
- Rear View2
- Eveready case3
- Care of Camera and Lens4
- Lens Characteristics4
- Loading the Camera6
- Automatic Exposure Counter7
- Film Load Reminder7
- Film-type Reminder Dial7
- Pre-selecting Lens Aperture8
- Shutter setting9
- Self-timer10
- Focusing11
- Picture Composing12
- Making the Picture13
- Locking the Mirror Up14
- Depth of Field15
- Depth of Field Preview Control16
- Changing the view Finder and Focusing Screen17
- Unloading the Camera18
- Double Exposure18
- Flash Synchronization19
- Changing Lenses21
- Interchangeable Lenses22
- Exposure Meter for Nikon F23
- Infra-red Pictures24
- Lens Hoods25
- Nikon Filters for Black-and-White Film26
- Film Cassette27
- Caution29
- List of Accessories for Nikon F30
PRE-SELECTING LENS APERTURE
To pre-set the aperture, turn the aperture ring on the lens barrel until the desired F-number is opposite the black indicator dot on the milled ring (Fig. 10). The diaphragm can be pre-set for intermediate openings between markings and it will still function automatically without disturbing the setting.
Interchangeable Nikkor-Auto from 28mm through 135mm (except 105mm F: 4 lens) and Telephoto-Zoom lenses are designed so that the diaphragm automatically closes down to the preselected aperture when the shutter button is depressed. The diaphragm automatically reopens to full aperture immediately after the shutter has been fired. Consequently, the finder image is seen bright and clear at all times except for the instant the shutter is released.
A button (Depth-of-Field Preview Control) is provided on the front of the camera to permit closing the diaphragm down manually to the preselected aperture. When this button is released, the diaphragm automatically opens to full aperture (See page 16). When interchanging lenses, no need be paid as to whether the shutter was previously wound. The diaphragm is automatic and foolproof.
SHUTTER SETTING
All 13 click-stop shutter speed setting are on a single selector dial (Fig. 11), which can be set before or the shutter is wound. Speeds are: 1, 1/2, 1/4, 1/8, 1/15, 1/30, 1/60, 1/125, 1/250, 1/500, 1/1000, B and T. The shutter speed setting desired is made by aligning the speed wanted with the black dot on the camera body.
The dial turns a full 360° in either direction and can be set from fastest to slowest speeds without obstruction.
Numbers on the Speed Selector Dial represent the actual shutter speed. For example, 125 on the dial represents 1/125 th second.
Bulb exposure: When the dial is set "B", the shutter will remain open for as long as he shutter release button is held depressed.
Time exposure: When the dial is set at the shutter will remain open even after your finger is removed from the shutter release button. To close the shutter, turn the dial to the right or to the left.
For greater convenience when using flash, the dial is color-coded to coincide with the color-coding of the Synch Control (See "Flash Synchronization" p. 19 for details).
Note that there is a pin on the top of the shutter speed selector dial to permit direct coupling of speed dial to exposure meter.
FOCUSING
If you look through the eyepiece of the Eye-Level View Finder, you will see a brilliant finder image reflected in the Fresnel-type screen. In the center of the finder field is a circular, split-image range finder section (Fig. 13).
When out of focus, the subjects are seen as a split-image (Fig. 14) in the center and at the some time are blurred in the remaining area of the finder screen (focusing screen). If a subject is in sharp focus, the split-image in the center becomes complete and continuous (Fig. 15) and the image appears sharp in the remaining area.
To bring your subject into sharp focus, turn the focusing ring (Fig. 16) on the lens to the right or the left. To determine the exact distance from the camera to the subject on which you are focused, look at the figure on the distance scale, opposite the black indicator line.
The Nikon F is designed so that its reflex mirror is in "position" of all times, permitting continuous, uninterrupted viewing and focusing (except for the instant shutter is released). The mirror returns to precise focusing-viewing position the instant the exposure is made, even with the camera hold upside down.
PICTURE COMPOSING
First, determine and then set the combination of shutter speed and lens aperture you want.
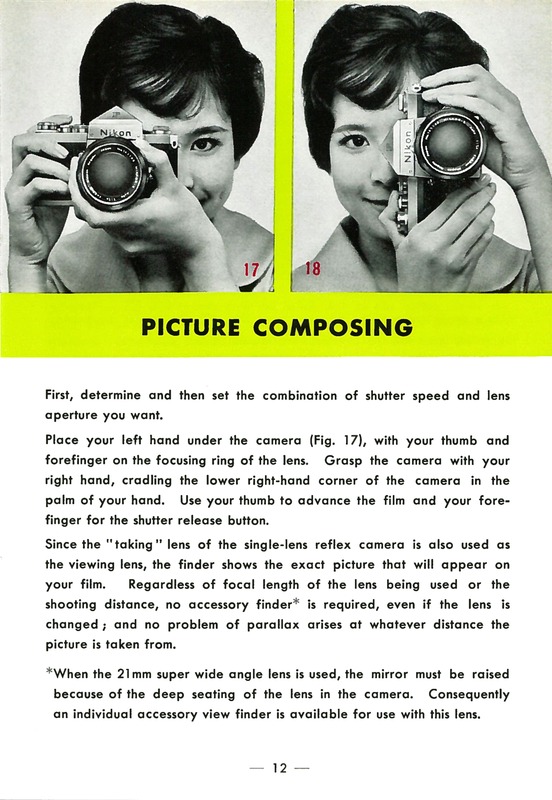
Place your left hand under the camera (Fig. 17), with your thumb and forefinger on the focusing ring of the lens. Grasp the camera with your right hand, cradling the lower right-hand corner of the camera in the palm of your hand. Use your thumb to advance the film and your forefinger for the shutter release button. Since the "taking" lens of the single-lens reflex camera is also used as the viewing lens, the finder shows the exact picture that will appear on your film. Regardless of focal length of the lens being used or the shooting distance, no accessory finder* is required, even if the lens is changed; and no problem of parallax arises at whatever distance the picture is taken from.
*When the 21mm super wide angle lens is used, the mirror must be raised because of the deep seating of the lens in the camera. Consequently an individual accessory view finder is available for use with this lens.


